

Exactly How to Dump Black Tank

Whether you're a new RV owner or window shopping, one of the most important items on your list should be learning how to dump an RV black tank. It can seem a bit overwhelming – and maybe even intimidating if it's your first time – but don't worry! We will help make sure you know exactly what to do so that you can confidently tackle this essential part of RV ownership and camping. You will be dumping your black tank quickly and efficiently and it will become second nature in no time!
The black tank is the wastewater tank that contains everything coming from the toilet. When talking about gray tanks, it refers to the dirty water from the kitchen sink, bathroom sink, shower, and washing machine. It is advisable to keep the tank valves closed until ready to dispose of the waste. Keeping both valves closed will help prevent the buildup of solids, insects, and septic gases in the RV. We recommend waiting until the tanks are nearly full before emptying them. Filling the black tank will help maintain the flow of liquids and ensure that it empties completely.
Supplies
Gloves: The first supply that you must have are gloves. As ER nurses we know all about germs and cross contamination. You want to prevent any of that during the entire dumping process. You can choose either disposable or reusable gloves.
Sewer Hose: The Sewer hose is the main line from your holding tanks to the ground where everything will drain from your RV into a sewer system.
Sewer Hose Connectors: The next supplies needed are two clear connectors. One that is 45 degrees and one that is 90 degrees. These pieces connect the sewer hose to the trailer and then the sewer hose to the actual drain in the ground. Using clear connectors helps you to monitor what is coming from your RV.
Sewer Hose Support: While not completely necessary, a Sewer hose support helps the draining process by using gravity. A number of RV parks are now requiring that you use one, so it is worth the investment.
Hose: It is best to have a designated hose to use for flushing out your black tank.
Bucket: A bucket is a great item to have on hand for measuring water as needed.
Tank Treatment: Using a tank treatment after a thorough cleaning your holding tanks will help to decrease smells, and break down solids.
Most travel trailers come with a button within your panel that tells the level of your black and gray tank. Don't just rely on the sensors as they can be unreliable.
Knowing When to Dump

Many new recreational vehicle enthusiasts rely on sensors, but unfortunately, they can be unreliable due to debris. To avoid any mishaps, we emphasize the importance of knowing when to empty your tanks using other methods. The first method is the "burp", which occurs when there's a pressure change in the black tank system and the air cannot escape, so it can only go upwards. Sometimes, the burp is very noticeable and obvious, while other times it's very subtle. Once we notice the toilet burping, we know we have approximately one day before we have to empty it. Secondly, as the black tank fills up, you can hear a change in tone when flushing the toilet, which is a quick and reliable method. Lastly, another way to know when it's time to empty it is the timeframe itself. For the two of us, our black tank lasts between seven and ten days. That will vary for each person due to the tank and family size. This is something you'll learn on the road, so don't get nervous! Now that you know when to empty your black tank, also make sure your gray tanks are at least three-quarters full, so that you can use that water to flush out your sewer hose.
Process of Dumping
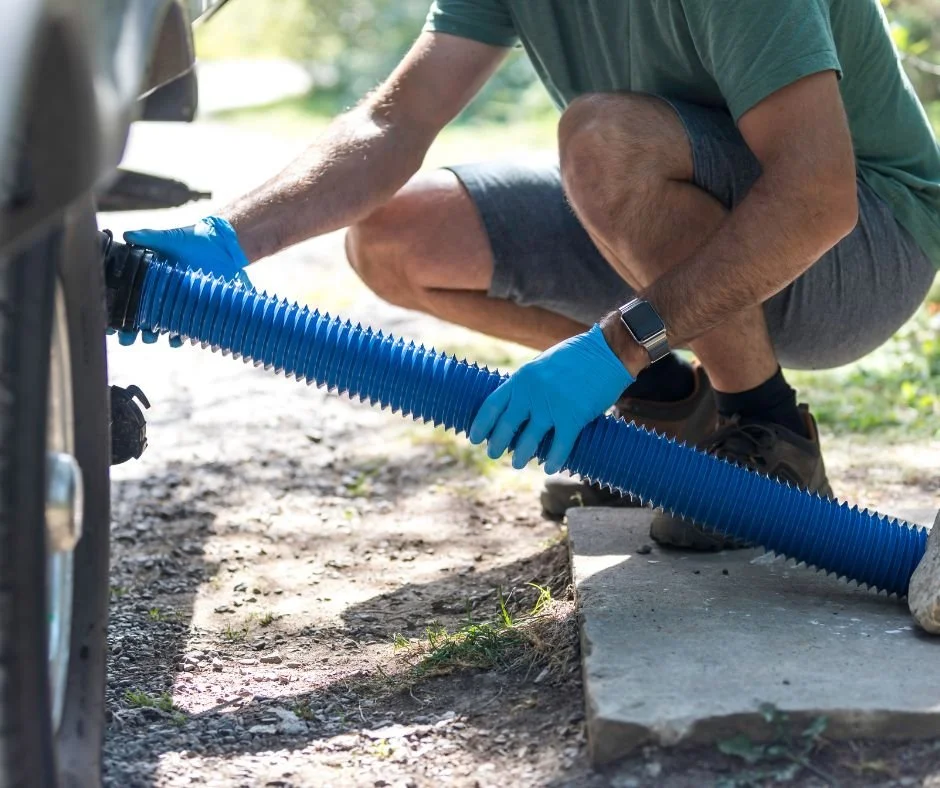


It’s time to “Let Er Rip” as Kyle would say! You can inform everyone in your RV that you will be dumping the black tank, so the toilet will be out of service for some time. Second, make sure you are fully prepared with all the necessary supplies, such as gloves and sewer connection hoses. Once you’re gloved up, hook your 45-degree clear connector to the outside port of your dumping tank on your RV and attach the sewer hose. Now extend it to ensure that it reaches. If it does not reach you will need to add additional sewer hoses. Next put your 90-degree elbow clear connection piece onto the other end of your sewer hose. This end of the hose threads or sits in the actual ground septic hookup. Once you have double checked your connections to ensure they are secure, you may pull your black tank valve to release the black water. We use the valterra valve. After pulling the valve, wait a few seconds, then turn on your black tank flush hose. Now you are dumping the black tank and simultaneously water is going into the black tank to flush it out. Leave the valves open until the water is running clear. Next, turn off the flush and wait for the remaining water to come out, then close your black tank valve. Then open your gray tank valve and leave it open until it is empty. Once your tanks are empty, you can close all valves. At this time, we perform our black tank treatment. Follow the instructions on your trusted tank treatment bottle to complete the process and prep the RV toilet for use. Be sure to rinse and stow away all of your supplies. Lastly, give your hands a good wash. As long as you follow these steps, this process is sure to be smooth sailing!
Treating the Black Tank
Treating the black tank is essential when RVing to help to prevent clogs and unpleasant odors. However, treating your black tank differs between RV models, sizes of tanks and products accessible in your area. For example, our RV has a 53 gallon black tank so we fill it with two cups of Aqua Kem and nine gallons of water. This is something that has worked great for us. We have avoided issues with clogging. Whatever concoction you use for treating your black tank, remember to always choose the version that includes more water than less. Trust us, you don't want to have to dig into a clogged tank! It is always best to do some research pertaining to your model and your size of tanks, as this will help you determine the measurements needed for treating your black tank successfully.
Tips for Preventing Clogs
When using the water systems inside your RV it is important to think about what goes into them to avoid clogs and blocked sensors. It is important to use adequate amounts of water while disposing of solids, such as flushing twice or more. The more water you put in will help break down any particles which might cause a blockage. Also, be aware that some toilet papers are not the best for RV waste tanks. Researching what kind of toilet paper to use will be very helpful in preventing clogged tanks. Additionally, never flush items such as diapers and household products like wipes or feminine hygiene products down the toilet. They are too large to fit through the tank filter and may cause a pipe or tank clog.
Be mindful and taking precautionary steps can save you from a messy cleanup!
Now that you know how to dump an RV black tank, it's time to get out there and enjoy your next trip! Before you hit the road, be sure to download our free printable RV Step-by-Step black tank checklist. This handy checklist will help ensure you don't forget any important steps in the dumping process. So what are you waiting for? Hop in your RV and hit the open road today!
Learn better by video? We got you covered!
This post may contain affiliate links and we may earn a small commission when you click on the links at no additional cost to you!